Do you use Microsoft Excel? Microsoft Excel is one of those in-built programs in the Windows operating system that enables you to navigate your spreadsheets. For instance, hitting the down arrow key will choose the following cell from the one chosen, which will ultimately scroll the sheet downwards. Have you ever observed a situation where your arrow keys abruptly stop working as they used to? If yes, then, you are not alone. We have seen a lot of Microsoft Excel users complaining about the same problem. Well, we understand that witnessing such an issue is annoying but the good news is that you can get rid of this problem, in no time. After reading this guide you will know exactly how to fix the problem.
Easy Solutions to Fix Arrow Keys Not Working in Excel on Windows 10, 11
Whether you are using Excel for school or work, being competent to navigate around the spreadsheets with arrow keys is actually a big time saver. It is frustrating when Microsoft Excel stops working the way it is supposed to be. But, you can make it work again using the solutions shared below. Without further ado, let’s get started:
Solution 1: Disabling Scroll Lock on your Keyboard
When you are using Excel, just be sure ScrLK (Scroll Lock) is not enabled. This feature enables the arrow keys as scrolling controls instead of moving. On your keyboard, search for the on or off key and hit it once again to disable the mode only when you find it activated. In addition to this, you can also disable this mode on your keyboard by utilizing the on-screen or virtual keyboard. On Windows OS, you may get the on-screen keyboard via the search feature and discover the Scroll Lock button. Deactivate it, and then check to see if the arrow keys are working properly in Excel. If in case you find that the arrow keys not working in Excel, proceed with other solutions below. Also Read: How to Fix or Bypass This PC Can’t Run Windows
Solution 2: Disabling Scroll Lock in the Status Bar of Excel
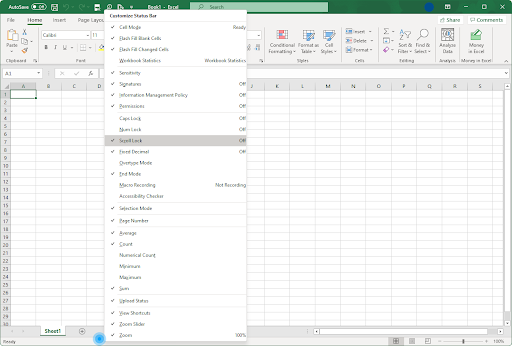
Additionally, users can also turn off the Scroll Lock mode in Microsoft Excel itself. You can do that by following the steps below: Step 1: Open Microsoft Excel, and launch a spreadsheet. Also, you can create a new spreadsheet if you want. Step 2: Wait for the spreadsheet to load in, after that, click right on the Status bar. You will find it at the bottom of your workbook. You can detect it by searching for the options like Page Layout & Zoom Slider. Step 3: From the context menu list of Status Bar, navigate to the Scroll Lock. If the Scroll Lock feature appears with ON status, then click on it again to disable it. Try the next method, if this fix didn’t help you resolve arrow keys not working in Excel.
Solution 3: Try to Enable Sticky Key Feature
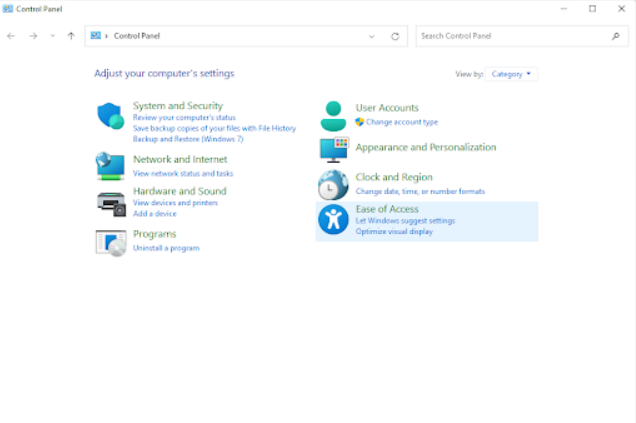
Enabling the Sticky Key feature in Windows might work for you. To use this tactic, follow the procedure below: Step 1: On your keyboard, press Windows and S keys together and type Control Panel in the search box. Step 2: From the searched results, click on the desired one to run it on your system. Step 3: On the next prompt, click Ease of Access to proceed. If the option isn’t accessible to you, then you need to set View By: Category. Step 4: Next, click Change how your keyboard works option under the Ease of Access Center. Step 5: Slide to the bottom to find the Make it Easier to Type section, then choose the Turn on Sticky Keys option by making a tick mark into the box beside it. Step 6: After that, click the Apply option to save the new changes and close the window. Once done, try to navigate the spreadsheet via arrow keys to check if the arrow keys not working in Excel are resolved. If not, then move on to the next solution. Also Read: Stretched Screen Horizontally Issues in Windows
Solution 4: Turn Off your Excel Add-ins
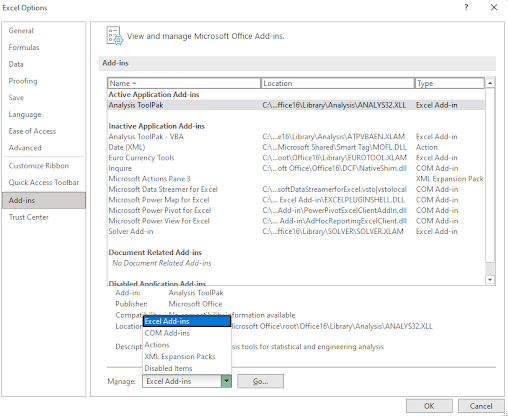
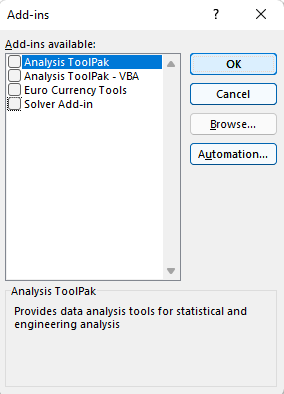
Add-ins in Microsoft Excel may be responsible for the wrong functioning of arrow keys. This occurs because add-ins tend to generate new code in Excel, which in some situations might interfere with the actual features. So, to fix arrow keys not working in Excel, you should consider disabling the previously installed add-ins on the application. For this, you can follow the step-by-step tutorial given below: Step 1: Run Microsoft Excel and click the Options button available on the left. Step 2: From the sidebar on the left, choose Add-ins. Now, a list of all your Excel Add-ins appeared, click on Excel Add-ins from the drop-down menu list, and then click on Go. Step 3: In order to disable all Excel add-ins, you need to first deselect the checkboxes presented next to each option in the dropdown menu of Add-ins. Step 4: Next, click OK and perform the same operation for every add-in shown in the context menu list. Now, you can either create a new worksheet or invoke the saved one to check if the arrow keys are working after disabling the add-ins. If in case the issue was fixed, then it is likely that one of those add-ins caused a conflict with Microsoft Excel.
Solution 5: Update your Keyboard Drivers
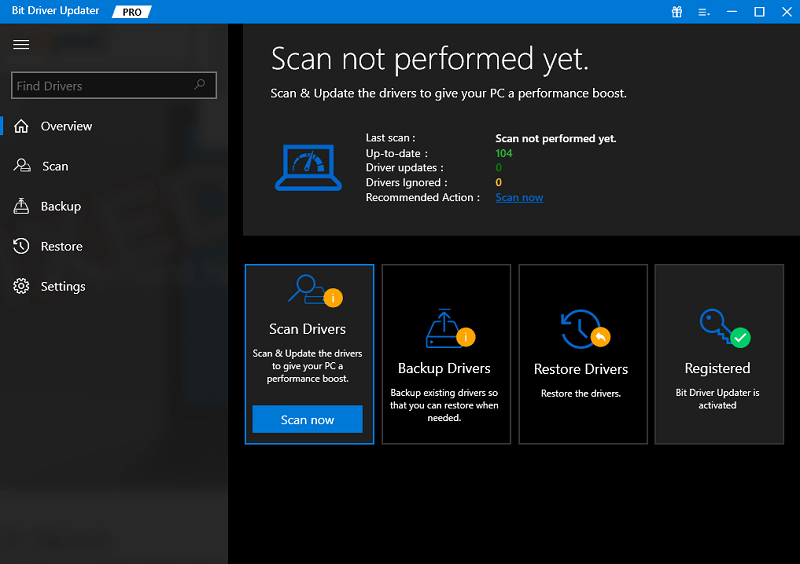
Using outdated, broken, or corrupt keyboard drivers can cause arrow keys not to work in Excel. To fix arrow keys not working in Excel, you should check and update your keyboard drivers. The task can be done either manually or automatically. You can visit the authorized website of your PC manufacturer and then download the driver file compatible with your Windows version. However, this will require expertise in a technical niche. So, if you don’t have the knowledge and time to update drivers manually, you can still do it automatically with Bit Driver Updater. Bit Driver Updater is one of the best driver updater software available in the market. It just takes 2 simple clicks of the mouse to update your PC drivers. The best thing about the utility is that it only provides drivers which are tested and certified under Microsoft’s WHQL testing process. Furthermore, the tool automatically creates a backup of the current version of drivers, allowing you to restore them if needed. Not only that, but the driver updater utility also lets you schedule driver scans as per your requirements, which will eventually save you a lot of time. Now, have a look at the steps below to update drivers via Bit Driver Updater: Step 1: Download & install Bit Driver Updater.
Step 2: Run Bit Driver Updater and click the Scan button available on the left menu pane. Step 3: Wait for a while until the scanning operation is completed. Once accomplished, go through the scan results and find an erroneous keyboard driver, then click on the Update Now option beside it. Step 4: You may alternatively click on the button named Update All available at the bottom right side of the window. This action will install all PC drivers in a single go. However, for this, you have to rely on the pro version of the Bit Driver Updater. The Bit Driver Updater’s pro version comes with full technical support and 60 days money-back guarantee. Also Read: How to Update Drivers on Windows
How to Fix Arrow Keys Not Working in Excel: Explained
Arrow keys in Excel can be a bit tricky to use. And, it may seem like there is no way out for you to access your spreadsheets, but nothing to worry about. We have above shared some tips & tricks that should help resolve this issue if it occurs again in the coming future. As for now, just be sure that your keyboard is set up and functioning properly and implement these fixes to bypass the arrow key not working in Excel. Do you want more? Then, sign up for our Newsletter! Doing so will give you access to tons of write-ups covering thousands of topics, and useful tips on how to make the most of your computer system & programs. If you have any questions then share them with us in the comments section below. Moreover, you can also follow us on Social Media platforms like Facebook, Twitter, Pinterest & Instagram.
