We have created this troubleshooting guide to explain the best strategies on how to fix Oculus Quest 2 not connecting. Without a bit of delay, let’s shift to the next section.
Most Workable Methods to Fix Oculus Quest 2 Not Connecting to Windows PC
All of these are tried and tested solutions by millions of people and tech enthusiasts. You may not have to try them all, just make your way through them till you find the one that works for you. Keeping device drivers up-to-date always helps the PC to work as expected. If you aren’t able to find the drivers manually, then do it automatically with Bit Driver Updater. A globally recognized driver updater utility that can fix all faulty or problematic drivers within a few clicks. It comes with a default system optimizer to boost the overall PC performance. Give Bit Driver Updater a try from the download button below.
Fix 1: Check PC Specifications
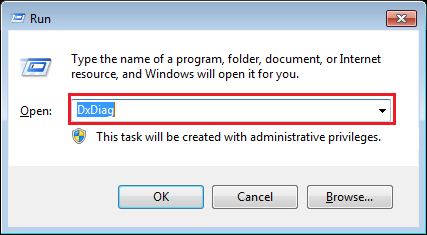
Before discussing complex solutions, let’s see if your PC is even capable of running Oculus Quest 2 headsets. The minimum PC specifications for Oculus Quest 2 are:- OS: Windows 10 Port: USB 3.0 CPU: Intel Core i5-4590 or an AMD Ryzen 5 1500X Graphics: Nvidia GTX 970, 1060 3GB and above. Important: A point to remember is that includes all the GTX 16-series graphics cards, except for the GTX 1650. Other than that, AMD RX 500, 600, 5000, and Vega series may do the job. Memory: 8 GB Now, follow these steps to quickly check your PC specifications: Step 1: On your keyboard, press the Windows logo key and R simultaneously to prompt the Run dialog box. Step 2: Then, type dxdiag and click on OK.
Step 3: Check your Operating System, Processor, and Memory. Step 4: After that, click on the Display tab to check your graphics card’s information. If your PC meets all the needed specs, let’s move on to the next fix. Also Read: 10 Best Virtual Reality (VR) Headsets that You Can Buy
Fix 2: Check USB Cable/Port
Want to know “how to connect Quest 2 to your PC properly?”. In order to connect your Oculus Quest to your PC, you’re going to have a high-quality USB cable that can take care of data and power, simultaneously. You can purchase the cable from Oculus for $79 or you can utilize a third-party cable, like Anker cable which amounts lesser than the original. If you are going to buy a new wire do ensure that it’s at least 3 meters long so you can take a walk around and have a more convenient experience. You can also try to use another USB port to check if the problem is caused by your USB port. At last, reset the Link cable on both ends(headsets and PC) to make sure that all the connections to your PC are safe and secure.
Fix 3: Updating Oculus Software
To ensure the seamless performance of the Oculus Link on your PC, make sure that you’re using the Oculus app and it’s updated. If not, just go to the Oculus support page and find the latest version of the app.
Fix 4: Log Out and Then Log In Your Account
It may sound stupid, but this fix has worked for many users and can also work for you. Sometimes, just logging out and then logging back in can solve multiple temporary issues in your Oculus Quest 2. Also Read: 13 Best Virtual Reality [VR] Apps For Android In 2021
Fix 5: Reboot Your System And Devices
If you’ve not tried this yet, what you’re doing? Give it a shot. A simple reboot can reset the software, PC’s ecosystem, and can also lead to fixing multiple similar glitches. Just close the Oculus Quest, and then shut down your PC. Wait for a while, and then turn back on your PC to see if the issues have been solved or not.
Fix 6: Update your Device Drivers
In order to keep your Oculus Quest 2 glitch-free, you should update your device drivers from time to time. To do so with ease, you can use Bit Driver Updater, an all-in-one solution for all driver as well as Windows-related queries. Using this driver updater tool is also quite simple and convenient. Below are the steps required to follow in order to update drivers through Bit Driver Updater. Step 1: Download Bit Driver Updater from the button below.
Step 2: Next, run the setup file and perform the on-screen instructions to get the software installed on your PC. Step 3: After that, invoke the Bit Driver Updater on your computer and wait for the driver updater utility to complete the scanning process. Step 4: Once done, then go through the entire list of outdated drivers and make a click on the Update All button.
However, you need to rely on the pro version of the utility in order to update all outdated drivers with just a click of the mouse. Not only that, but the pro version unlocks the complete potential of the software. It also provides 24/7 technical support and a 60-days full refund guarantee. Also Read: Using Virtual Reality For Children With Autism – TechPout
Fix 7: Turn off USB Power Settings
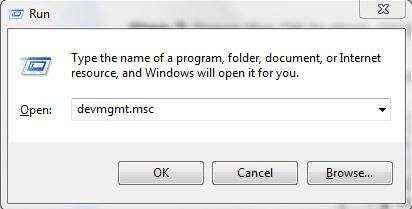
If none of the above-mentioned tactics helped you, then consider disabling the USB power settings that might work. Here is how to do that: Step 1: Simultaneously hit Windows logo + R keyboard keys to open Run Dialog Box. Step 2: Then, input devmgmt.msc inside the run dialog box, and press Enter key.
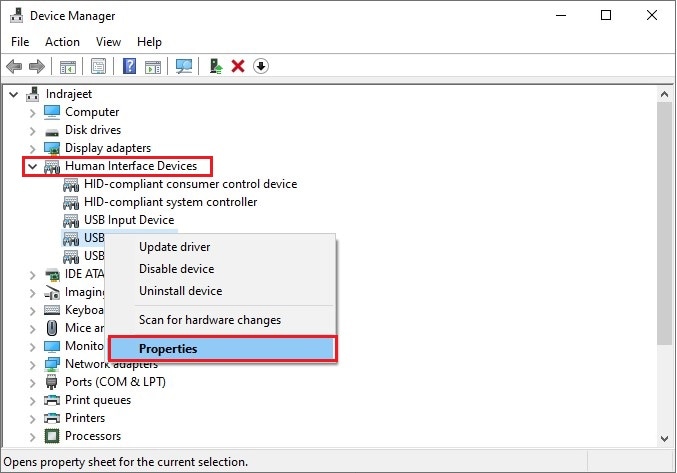
Step 3: After that, navigate to the Human Interface Device and expand its category. Step 4: Make a click right on the USB Input Device. Step 5: Next, choose Properties.
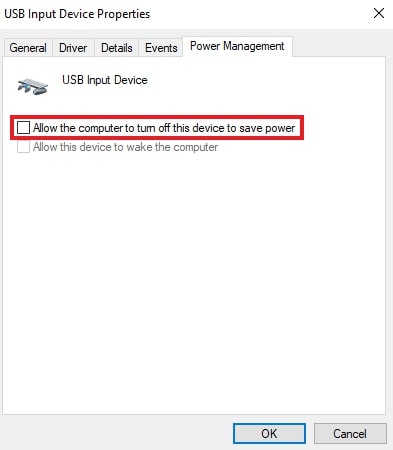
Step 6: On the next window, head to the Power Management. Step 7: And, make sure the box presented before Allow the computer to turn off this device to save power is unmarked. At last, click on OK. Once done, then restart your computer and check to see if the issue has been resolved. Also Read: 3 Ways Technology Is Enabling A New World Online
Oculus Quest 2 Not Connecting to Windows PC: FIXED
Hopefully, now Oculus Quest 2 not connecting to Windows 10, 8, 7 PC won’t bother you anymore. In this tutorial, we have discussed the easy and most workable tactics to fix this inconvenience. Please, feel free to share your queries in the comments below. We will try our best to help you out. Do you have words to add? Drop us a comment below. In addition to this, do subscribe to our Newsletter for reading more troubleshooting guides just like this one. Furthermore, follow us on Facebook, Twitter, Instagram, and Pinterest.


